Tuesday, July 26, 2011

Grilled Stuffed Jalapenos

Who doesn't love a good creamy stuffed jalapeno?? Growing up I was fortunate enough to go on vacation with my cousin and her parents. We would go to this place in Keystone South Dakota called the Red Garter Saloon. It was a really cool old time western saloon and they would have gun fights every night in the streets. My cousin and I would always order a shirley temple (until we were 21) and Jalapeno poppers. They had the best poppers ever and couldn't wait till they cooled enough to devour! I decided I would like to make some poppers but maybe a little healthier version. So, I did some searching and found this fantastic recipe from my cooking light magazine.


Grilled Stuffed Jalapenos
Yields: 14 servings


2 center cut slices bacon ( you could also substitute turkey bacon to make it even healthier)
1/4 cup (4oz) cream cheese softened
1/4 cup (4oz) fat free cream cheese softened
1/4 cup (1oz) shredded extra sharp cheddar
1 teaspoon lime juice
1/4 teaspoon salt
1 small garlic clove, minced
14 Jalapeno peppers, halved lengthwise and seeded (If you find larger ones you may not need as many)
Cooking Spray
2 Tablespoons chopped fresh cilantro
2 Tablespoons chopped seeded tomatoes

  1. 1. Preheat grill to medium high heat.
  2. Cook bacon in skillet till crispy. Crumble Bacon
  3. Combine bacon, cheeses, and next 4 ingredients (through garlic) in a bowl, stirring to combine
  4. Divide cheese evenly and fill the pepper halves. 
  5. Place peppers, cheese side up on a grill rack or grate coated with cooking spray
  6. Cover and grill peppers about 8 minutes until bottoms of peppers are charred and cheese is lightly brown.
  7. Place peppers on a serving platter and sprinkle with cilantro and tomato
Serving size 2 halves
Calories: 56 Fat: 4.1


Here they are on the grate that I use very often!! You could also make these up ahead of time and just cover, put in fridge and will be ready to throw on the grill when your ready. 

I would highly suggest using caution when eating these because they are very highly addictive!!!!

Sunday, July 24, 2011

Fresh Raspberry Lemonade

Summer is so full of such wonderful fruits and veggies!! Unfortunately, I do not have a garden but luckily I have friends and relatives that do. I was fortunate enough to get a few bags of fresh raspberries from my mother in law. Now find something I can make with my fresh raspberries. I made a raspberry cheesecake last week with my Strawberry Cheesecake and just substituted berries. I wanted to make something different that I have never made before. Looked through all my magazines and found a wonderful Fresh Raspberry lemonade recipe!! Score. It did seem a little labor intensive but totally worth my time!!


Fresh Raspberry Lemonade
courtesy of Cooking Light

Ingredients
  • 3/4 cup sugar
  • 2 cups water, divided
  • 2 cups fresh raspberries
  • 1/2 cup fresh orange juice (about 1 orange)
  • 1 3/4 cups fresh lemon juice (about 13 medium lemons)
  • 16 ounces sparkling water, chilled

Preparation
  • 1. Combine sugar and 3/4 cup water in a small saucepan; bring to a boil. Cook 2 minutes, stirring until sugar dissolves. Cool to room temperature.
  • 2. Combine remaining 1 1/4 cups water and raspberries in a blender; pulse 10 times or until well blended. Strain mixture through a fine sieve into a large pitcher; discard solids. Add orange juice, lemon juice, sparkling water, and cooled syrup to pitcher; stir to combine. Serve immediately over ice. ( You may also add a little vodka to it for an adult cocktail!!)  I also did some of the steps ahead of time so I could just pour it all together when I needed it.

  • This is such a great refreshing drink not too sweet or tart just right!

Monday, July 18, 2011

California Grilled Veggie Sandwich

I LOVE Veggies and could eat them all day everyday! I don't think there is a veggie out there that I don't like. Now this sandwich that I came across can be very versatile as to your likings. I love all veggies so the more the merrier for me. The best part of this sandwich is the sauce though!! The night I made these the temperature was about 90 and the humidity was about 100 percent plus. Not really going to complain because it is better than the alternative that comes around January. So, trying to take pictures of my food on the grill became quite the task as my lens kept fogging up because of the high humidity. I got a few though but had to work quick before my lens fogged up again.
Juicy Sandwich with the creamy spread and tangy cheese!!

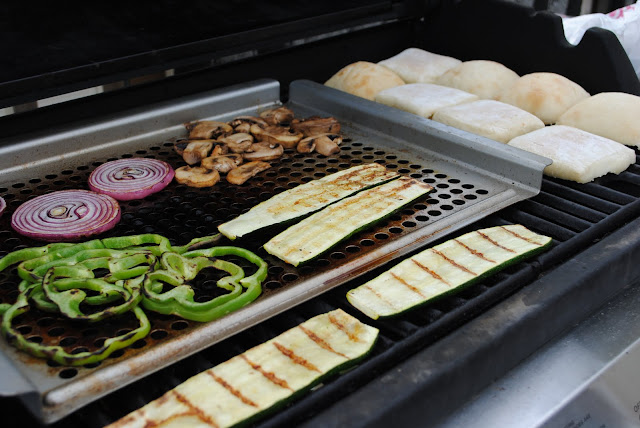
First u want to choose which veggies you are going to use for your sandwiches.

You can place them directly on the grill or if you have a handy dandy Grill Grate from Crate and Barrel you can also use that. I love mine and use it often.
I also like to toast my buns lightly on the grill. You could also use foccacia or any other bread that you would like but I love cibatta so that is my favorite. You could also used a whole loaf and then cut into individual servings once the sandwich is put together. Cibatta is also great because it has craters and holes in it so the yummy sauce goes deep into the bread.

California Grilled Veggie Sandwich
courtesy of allrecipes.com

Ingredients

  • 1/4 cup mayonnaise
  • 3 cloves garlic, minced
  • 1 tablespoon lemon juice
  • 1/8 cup olive oil
  • 1 cup sliced red or green bell peppers 
  • 1 small zucchini, sliced
  • 1 red onion, sliced
  • 1 small yellow squash, sliced
  • 2 (4-x6-inch) focaccia bread pieces, split horizontally or cibatta 
  • 1/2 cup crumbled feta 

  • Directions

    1. In a bowl, mix the mayonnaise, minced garlic, and lemon juice. Set aside in the refrigerator. (the flavors really mix together if they get to sit longer)
    2. Preheat the grill for high heat.
    3. Brush vegetables with olive oil on each side. Brush grate with oil. Place bell peppers and zucchini closest to the middle of the grill, and set onion and squash pieces around them. Cook for about 3 minutes, turn, and cook for another 3 minutes. The peppers may take a bit longer. Remove from grill, and set aside.
    4. Spread some of the mayonnaise mixture on the top part of the bread, and sprinkle with feta cheese. Assemble sandwich with your vegetables and enjoy!! 

    You can really add any veggies you would like to this sandwich and don't have to stick to the specific ones in the recipe. This sandwich would also be good with just raw veggies too.

Monday, July 11, 2011

Strawberry Cheesecake

So, who does not love cheesecake? If you don't there must be something wrong with you! I love a good creamy cheesecake. Well tis the season for fresh vegetables and fruit. I was able to get some fresh strawberries from my cousin who has a strawberry patch and decided to make a cheesecake. I do have to say that I have become quite the expert at making cheesecakes. They can be very touchy but when they work they are beautiful and this one definitely worked for me. Below is my adorable niece who went with to get the strawberries and had a hard time keeping her little fingers off the juicy berries.


Strawberry Cheesecake
Courtesy of All Recipes
Ingredients

  • 1 1/4 cups graham cracker crumbs
  • 1/4 cup sugar
  • 1/3 cup butter or margarine, melted
  • 2 (10 ounce) packages frozen sweetened strawberries, thawed (use fresh which if you have the option)
  • 1 tablespoon cornstarch
  • 3 (8 ounce) packages cream cheese, softened
  • 1 (14 ounce) can sweetened condensed milk
  • 1/4 cup lemon juice
  • 3 eggs
  • 1 tablespoon water


Directions

  1. Combine graham cracker crumbs, sugar and butter. Press onto the bottom of an ungreased 9-in. spring form pan. Refrigerate for 30 minutes. 
  2. In a blender or food processor, combine strawberries and cornstarch; cover and process until smooth. Pour into a saucepan; bring to a boil. Boil and stir for 2 minutes. Set aside 1/3 cup strawberry sauce; cool. Cover and refrigerate remaining sauce for serving. 
  3. In a mixing bowl, beat cream cheese until light and fluffy. Gradually beat in milk. Add lemon juice; mix well. Add eggs, beat on low just until combined. 
  4. Pour half of the cream cheese mixture over crust. Drop half of the reserved strawberry mixture by 1/2 teaspoonfuls onto cream cheese layer. Carefully spoon remaining cream cheese mixture over sauce. Drop remaining strawberry sauce by 1/2 teaspoonfuls on top. With a knife, cut through top layer only to swirl strawberry sauce. 
  5. Bake at 300 degrees F for 45-50 minutes or until center is almost set. Cool on a wire rack for 10 minutes. Carefully run a knife around edge of pan to loosen; cool 1 hour longer. 
  6. Refrigerate overnight. Remove side of pan. Thin chilled strawberry sauce with water if desired; serve with cheesecake. Store in the refrigerator.


Sometimes Patience is the best medicine. Do not try and rush a cheesecake because it will never work! I always want to try and open the spring form pan right away so the cake cools off faster but always ends up putting big cracks in the cheese cake so, please be patient it will be worth it in the end!! What is your favorite Cheesecake?